
By Mario Rojas, Senior Security Researcher
Your First Google Custom Search Engine
In our previous post, we discussed the potential of Google Custom Search Engines (CSEs) for OSINT and corporate threat intelligence. We covered what a CSE is, its benefits, and some potential drawbacks. Now, it’s time to get hands-on and set up your first Google Custom Search Engine. This guide will walk you through each step, ensuring you have a tailored search tool that enhances your threat intelligence capabilities.
Step 1: Accessing the Google Custom Search Engine Platform
Start by navigating to the Google Custom Search Engine homepage. Make sure you are logged into your Google account, as you will need it to create and manage your CSE.
If you do not have an account yet, you will need to create one.
Step 2: Creating a New Search Engine
Once on the CSE homepage, click the “Create a search engine” button, or go directly to your “Control Panel” and click “Add”. Fill out the form to set up for your search engine.
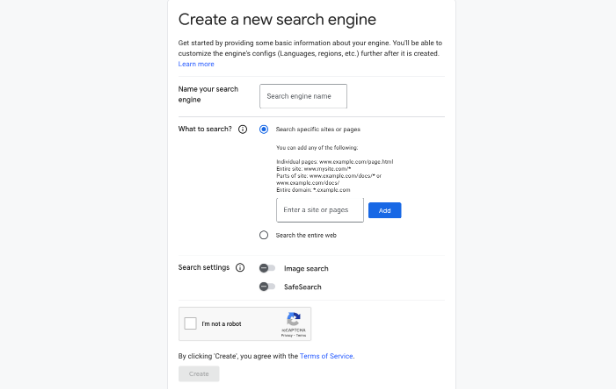
- Name your search engine: Choose a name that reflects its purpose, such as "OSINT Threat Intel Search" if you're creating a CSE for OSINT purposes.
- What to search: Select “Search specific sites or pages” to limit results to relevant sites.
- Search settings: Adjust based on your needs, such as enabling “SafeSearch” to filter out explicit content.
Step 3: Defining the Search Scope
The power of a CSE lies in its ability to search specific websites. In the “Sites to search” section, you will define the scope of your search engine.
Adding Websites: Start by adding domains you want the CSE to focus on. For instance, we can create a CSE for vulnerability intelligence, by adding only sites we trust to the list. We can then filter out the noise and narrow down the search results to those relevant to our work.
Here’s a list of sites to get you started:
- www.reddit.com/r/cybersecurity/
- www.reddit.com/r/netsec/
- www.krebsonsecurity.com
- www.securityweek.com
- www.helpnetsecurity.com
- www.darkreading.com
- www.thehackernews.com
- otx.alienvault.com
- x.com
Once you are done, simply click “Create”
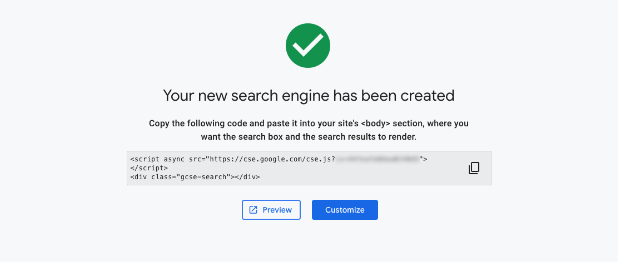
Your basic CSE has now been created, you can start searching by clicking the “Preview” button, or click “Customise” to further improve your CSE.
Step 4: Configuring Basic Search Features
Fine-tune your CSE by configuring these settings:
- Description: Although optional, it is always recommended to add a small description of that the CSE will be used for.
- Region: If your work focuses on specific regions, you might want to limit the search results to a particular region. This is useful when researching events of interest taking place in specific areas.
- Sites to exclude: Besides defining specific sites to search, you can also add sites you do not want results from. This is more useful when your CSE is searching through the entire web.
Step 5: Customising the Look and Feel
If you plan to embed your CSE on a website or an internal dashboard, consider customising its appearance.
- Themes and Layouts: Google allows you to choose from several themes and layouts. While this may seem like a minor detail, ensuring that your CSE is visually integrated with your existing tools can enhance user experience.
- Custom Logo: You can also upload a custom logo if you are embedding the CSE in a corporate environment, giving it a more professional appearance.
For example, this is what our CSE looks like after adding a logo and updating the colour scheme to match our brand.

Step 6: Testing Your CSE
Before deploying your CSE, it is essential to test it and ensure it is returning the results you need.
- Run Test Queries: Enter some typical queries you expect to run and see how the CSE performs. Are the results relevant? Is there too much noise from unrelated sites?
- Fine-Tuning: Based on your test results, you may want to go back and adjust the included/excluded sites or tweak the search settings further.
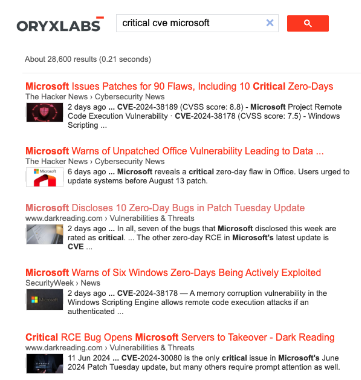
For example, a quick search for “critical cve microsoft” confirms the results include only those on the sites that we selected when creating our CSE.
Step 7: Deploying and Sharing Your CSE
Once satisfied with your CSE’s performance, it is time to deploy it.
- Embedding: Google provides a code snippet that you can embed into any webpage. This is particularly useful if you want to integrate the CSE into your internal tools, or a company portal.
- Sharing: If you want to share the CSE with colleagues or team members, you can provide them with a direct link. This makes it easy for others to access and benefit from the custom search engine you have created.
Conclusion
By following these steps, you have now created a Google Custom Search Engine tailored to your specific OSINT and threat intelligence needs. This tool will streamline your research and help you focus on the most relevant information sources.
In our next post, we’ll explore advanced configurations, including how to use APIs to automate searches and how to integrate your CSE with other tools.
Stay tuned and, in the meantime, start experimenting with your new CSE to see how it can enhance your workflow.